

Social media success takes planning & keeping your social house in order.
Social media success takes planning & keeping your social house in order. This checklist includes screen shots and video for optimizing your brand on seven social networks. Use it now to as your guide to social media success…
 Everyone wants to experience social networking success…
Those small business social media success stories you hear about? They had their ducks in a row, and their social house was probably in order!
So, are you ready to get started spiffing up your social house?
Everyone wants to experience social networking success…
Those small business social media success stories you hear about? They had their ducks in a row, and their social house was probably in order!
So, are you ready to get started spiffing up your social house?
 Imagery and videos are like the “gingerbread” on the house, and for many, this is often the most fun.
If you have reserved a social profile in your brand name for the sole purpose of assuring it be there for the future, do check in on it. Make sure the correct links and imagery are reflected for your brand. If it is more appropriate to leave the profile void of details, then at least change the password if it has been awhile since you visited.
Your social media success does not hinge on the number of profiles where you are active as much as it is attached to the quality of presentation.
Now lets get more social network specific…
Facebook
Facebook allows you many opportunities to be brand-forward, so what you enter in on your profile and Business Page directly contributes to your social media success on the platform, and your “FEO” (SEO, Facebook-style).
Use your brand and niche key words, and sprinkle them throughout your text.
For Facebook Personal Profiles:
Your Facebook Profile has categories of details: Timeline, About, Friends, Photos, and More. Since your profile is your passport to the rest of Facebook, go through these with a fine-tooth comb.
Under About, edit and polish your sub-categories:
Imagery and videos are like the “gingerbread” on the house, and for many, this is often the most fun.
If you have reserved a social profile in your brand name for the sole purpose of assuring it be there for the future, do check in on it. Make sure the correct links and imagery are reflected for your brand. If it is more appropriate to leave the profile void of details, then at least change the password if it has been awhile since you visited.
Your social media success does not hinge on the number of profiles where you are active as much as it is attached to the quality of presentation.
Now lets get more social network specific…
Facebook
Facebook allows you many opportunities to be brand-forward, so what you enter in on your profile and Business Page directly contributes to your social media success on the platform, and your “FEO” (SEO, Facebook-style).
Use your brand and niche key words, and sprinkle them throughout your text.
For Facebook Personal Profiles:
Your Facebook Profile has categories of details: Timeline, About, Friends, Photos, and More. Since your profile is your passport to the rest of Facebook, go through these with a fine-tooth comb.
Under About, edit and polish your sub-categories:
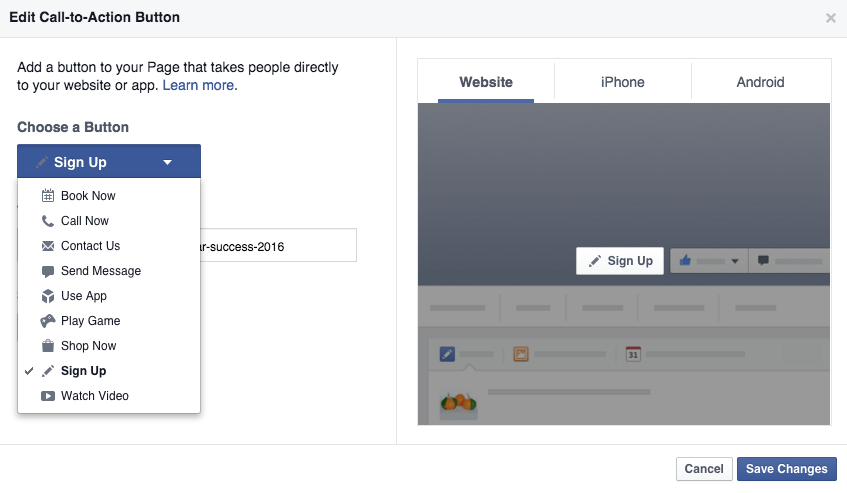 You can choose to promote your call to action, so make your call-to-action delicious to encourage your social media success here. Don’t forget to insert a correct web address link where the pop-up box asks for it.
For Facebook Groups:
If you have a Facebook group for your brand or organization, you might as well tidy up here too.
Facebook does not give you as many areas to edit in Facebook Groups. The main areas you want to pay attention to are:
Group Image – Decide on a banner, or to feature your most active members. In the far right of this space is a button with three dots. Clicking this will let you get into your settings to edit your Group’s name, icon, type, tags, privacy, customized web address, and the description to the most current preferences.
Group Description – This is how potential new members will find your group. Make your words as relevant to the group’s purpose as possible. Use the tags feature wisely, as this is how your group will be suggested to others by Facebook.
If you’ve chosen to have a Buy/Sell/Trade Facebook group, you will want to learn about For Sale Group Features, and make the rest of the edits to your group fit with these purposes.
From there, tidy up your Files section to delete any really old files that are no longer relevant, or files members snuck in that really do not fit the group’s purpose.
Facebook has many options that afford for just as many details to track. Tending to them gives you a greater chance of social media success on the Facebook platform.
Twitter
After the intricacies of Facebook above, Twitter will seem like a breeze!
From your profile page, if you click on the “Edit Profile” button on the far right, just below the banner image, Twitter makes it easy to quick edit the:
You can choose to promote your call to action, so make your call-to-action delicious to encourage your social media success here. Don’t forget to insert a correct web address link where the pop-up box asks for it.
For Facebook Groups:
If you have a Facebook group for your brand or organization, you might as well tidy up here too.
Facebook does not give you as many areas to edit in Facebook Groups. The main areas you want to pay attention to are:
Group Image – Decide on a banner, or to feature your most active members. In the far right of this space is a button with three dots. Clicking this will let you get into your settings to edit your Group’s name, icon, type, tags, privacy, customized web address, and the description to the most current preferences.
Group Description – This is how potential new members will find your group. Make your words as relevant to the group’s purpose as possible. Use the tags feature wisely, as this is how your group will be suggested to others by Facebook.
If you’ve chosen to have a Buy/Sell/Trade Facebook group, you will want to learn about For Sale Group Features, and make the rest of the edits to your group fit with these purposes.
From there, tidy up your Files section to delete any really old files that are no longer relevant, or files members snuck in that really do not fit the group’s purpose.
Facebook has many options that afford for just as many details to track. Tending to them gives you a greater chance of social media success on the Facebook platform.
Twitter
After the intricacies of Facebook above, Twitter will seem like a breeze!
From your profile page, if you click on the “Edit Profile” button on the far right, just below the banner image, Twitter makes it easy to quick edit the:
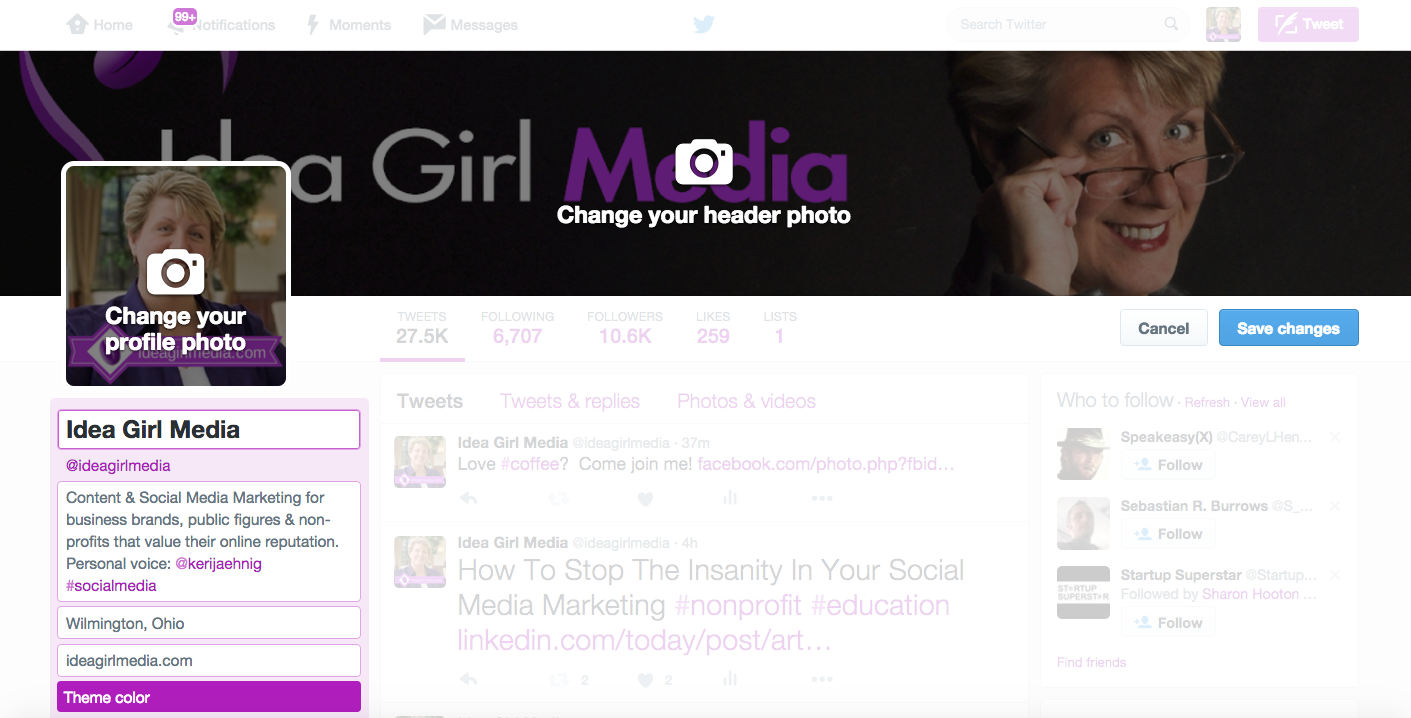 Always err on the side of caution when disclosing personal details online.
You get 160 characters for your bio, so be strategic with niche key words and one or two hashtags.
Your theme color can be one of the pre-set colors Twitter offers you, or you can use a custom color code to match your brand.
Regarding imagery, people like to connect with other people, so decide whether you will use a face image, or your logo. If you have been struggling to reach goals, this might be a good time to test something new. The banner image is very large, so be careful when choosing. You want to avoid a fuzzy appearance. It may be to your advantage to have a designer help you with something customized at 1500 x 500.
Give some attention to:
Always err on the side of caution when disclosing personal details online.
You get 160 characters for your bio, so be strategic with niche key words and one or two hashtags.
Your theme color can be one of the pre-set colors Twitter offers you, or you can use a custom color code to match your brand.
Regarding imagery, people like to connect with other people, so decide whether you will use a face image, or your logo. If you have been struggling to reach goals, this might be a good time to test something new. The banner image is very large, so be careful when choosing. You want to avoid a fuzzy appearance. It may be to your advantage to have a designer help you with something customized at 1500 x 500.
Give some attention to:
 This goes for all social platforms.
On the left bar also head into the following categories to update your preferences:
This goes for all social platforms.
On the left bar also head into the following categories to update your preferences:
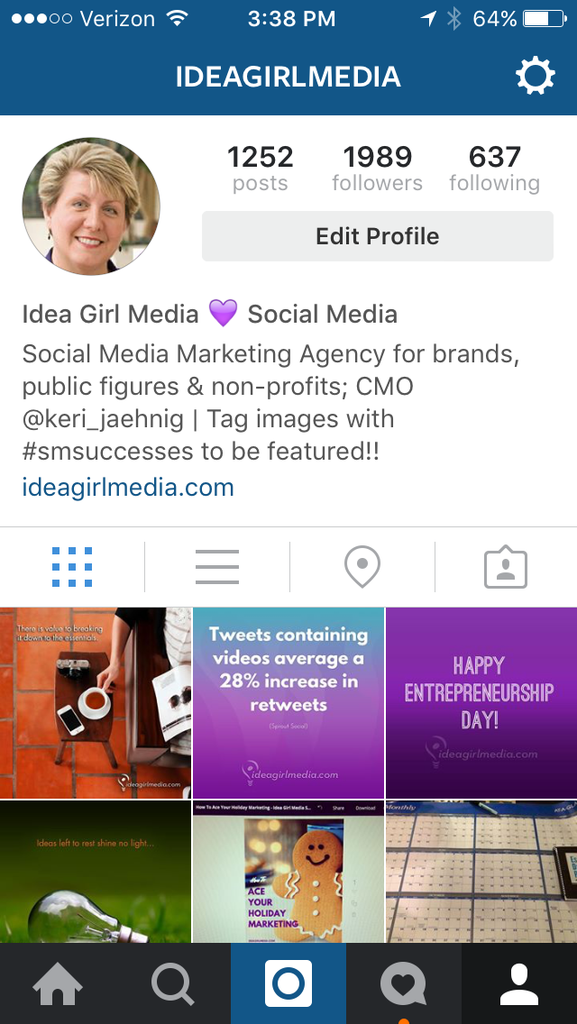 It may be easiest to click the “Edit Profile” button – This can be done on mobile or desktop.
The text in the bio should tie to your strategy goals, lead people to learn more about your business, and also draw them in to explore your Instagram gallery. Edit your bio to be clear, concise, and include brand and niche key words.
Your link can be changed as often as you like. Be sure this is always the link tied to your current promotion or brand project.
Once you are satisfied with the basic profile details, scroll down to click the box to let Instagram recommend your profile when recommending similar accounts, and click, “submit.”
Approach the left bar of settings categories much like you did with your Twitter profile. Update your profile photo if desired, change your password, and revoke access to unnecessary apps.
Next, inventory the gallery. Your efforts should be a lot like curating a magazine. If there are images or videos here that you may have changed your mind about, copy and save them, and delete them for now. Your goal is to put forward your best brand presence. You can re-purpose this content on other channels if you wish.
Always save your work as you go.
In the top upper right, click your ID name, and choose, “view profile.” Check to make sure you are satisfied with your final edits, and log out when you are finished.
Logging out provides safety to your profile, and your mobile phone. Again, security strength always contributes to social media success.
Pinterest
Again, a very visual platform – Take a look at your profile as a regular web visitor before you log in to make any edits. Once logged in, click up in the top right corder to the “Edit Profile” button, and click.
First, your profile image is very small here, so it should match all of your other platforms, or be a simple version of your logo.
Second, make any tweaks to your bio. You get a space slightly longer than Twitter provides. The box will turn red if you exceed the character limit.
Hopefully, you’ve already verified your website. If not, do this! It looks harder than it is – If you hand this off to your web developer, or if you are WordPress savvy, it will take ten minutes or less. Get the instructions to verify your website on Pinterest here.
Save your edits by clicking the red button on this pop up box.
From there, you will want to click the button next to the Edit Profile button – It has a spoke wheel and arrow. The first option is “Edit Settings.” Clicking that will bring you to a screen with multiple categories showing.
Up first, you can change your password and tweak your category if desired. You have already completed the profile options. So, from here, be sure all of the buttons reflect your preferences for notifications, and your preferred social networks are connected and enabled.
At the bottom of your screen, click the red button to save settings when you are finished.
Now that your general settings are refreshed, take an inventory of your boards:
It may be easiest to click the “Edit Profile” button – This can be done on mobile or desktop.
The text in the bio should tie to your strategy goals, lead people to learn more about your business, and also draw them in to explore your Instagram gallery. Edit your bio to be clear, concise, and include brand and niche key words.
Your link can be changed as often as you like. Be sure this is always the link tied to your current promotion or brand project.
Once you are satisfied with the basic profile details, scroll down to click the box to let Instagram recommend your profile when recommending similar accounts, and click, “submit.”
Approach the left bar of settings categories much like you did with your Twitter profile. Update your profile photo if desired, change your password, and revoke access to unnecessary apps.
Next, inventory the gallery. Your efforts should be a lot like curating a magazine. If there are images or videos here that you may have changed your mind about, copy and save them, and delete them for now. Your goal is to put forward your best brand presence. You can re-purpose this content on other channels if you wish.
Always save your work as you go.
In the top upper right, click your ID name, and choose, “view profile.” Check to make sure you are satisfied with your final edits, and log out when you are finished.
Logging out provides safety to your profile, and your mobile phone. Again, security strength always contributes to social media success.
Pinterest
Again, a very visual platform – Take a look at your profile as a regular web visitor before you log in to make any edits. Once logged in, click up in the top right corder to the “Edit Profile” button, and click.
First, your profile image is very small here, so it should match all of your other platforms, or be a simple version of your logo.
Second, make any tweaks to your bio. You get a space slightly longer than Twitter provides. The box will turn red if you exceed the character limit.
Hopefully, you’ve already verified your website. If not, do this! It looks harder than it is – If you hand this off to your web developer, or if you are WordPress savvy, it will take ten minutes or less. Get the instructions to verify your website on Pinterest here.
Save your edits by clicking the red button on this pop up box.
From there, you will want to click the button next to the Edit Profile button – It has a spoke wheel and arrow. The first option is “Edit Settings.” Clicking that will bring you to a screen with multiple categories showing.
Up first, you can change your password and tweak your category if desired. You have already completed the profile options. So, from here, be sure all of the buttons reflect your preferences for notifications, and your preferred social networks are connected and enabled.
At the bottom of your screen, click the red button to save settings when you are finished.
Now that your general settings are refreshed, take an inventory of your boards:
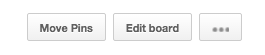 Over time, you can accumulate an abundance of pins. The newer “move” feature is terrific for re-organizing Pinterest boards! Simply click any of your board titles, and when you see all the pins for that board, in the upper right, click “move.” And then select the pins you wish to move, and to the preferred board.
During the process of organizing your Pinterest boards, it is important to tweak and edit board names as well board descriptions.
Over time, you can accumulate an abundance of pins. The newer “move” feature is terrific for re-organizing Pinterest boards! Simply click any of your board titles, and when you see all the pins for that board, in the upper right, click “move.” And then select the pins you wish to move, and to the preferred board.
During the process of organizing your Pinterest boards, it is important to tweak and edit board names as well board descriptions.
 Very simple – Click the boxes that suit your preference, and click to save.
Once you’re done checking out your refreshed profile look, head to the left side bar, and click “Settings.” You’ll be led to a screen with a series of buttons to switch on and off. This is pretty self-explanatory. Also, this saves automatically with the click or check.
Make the decisions that are best for you. One suggestion: Under Advanced Settings, allow the circle stream in navigation. If you have been around long enough to have curated connection circles, it’s nice to be able to see what your contacts are up to, right?
Above Settings on the left, you can click on “Collections.” Here, you will see the collections you own and are following. On any that you own, you will want to tweak:
Very simple – Click the boxes that suit your preference, and click to save.
Once you’re done checking out your refreshed profile look, head to the left side bar, and click “Settings.” You’ll be led to a screen with a series of buttons to switch on and off. This is pretty self-explanatory. Also, this saves automatically with the click or check.
Make the decisions that are best for you. One suggestion: Under Advanced Settings, allow the circle stream in navigation. If you have been around long enough to have curated connection circles, it’s nice to be able to see what your contacts are up to, right?
Above Settings on the left, you can click on “Collections.” Here, you will see the collections you own and are following. On any that you own, you will want to tweak:
 Just click the 3 little dots in the upper right of the Collection card and you are on your way!
Communities
You can reach the Google+ Communities you belong to on the left side bar via your G+ profile (or Company Page). Once you click, you’ll be taken to a screen that shows you any Community invitations you may have missed. Accept or decline, as you wish.
Across the top in green, you can see Google+ Communities you are a member of, and this would be a great time to edit memberships – Hop out of any that do not fit your business goals.
Across the top on the far right is a tab for Communities that you own or Admin. Just like the Collections, you will click the mini-card to reach your Google+ Community, and click the three dots at the upper right to tweak images and title text.
Don’t miss the switch at the bottom to either make the Community available in search or to make it private, and only visible to Community members.
Before you leave any Community you own or Admin, take a tour through the content categories and make sure there are no posts to delete that you may have missed before now. Negative or misplaced posts can inhibit social media success.
Google+ Company Pages
Before anything else, it is important that your business is a verified business by Google so you can be found by your target market online. Your activities on Google+ will then also help give you lift in search.
If your business is not yet verified, or you have questions about this, be in touch and we’ll point you in the right direction.
Due to the fact that Google+ allows Company Pages to interact in Communities, the sidebar on the left will look identical to the one you see for your Google+ Profile. You should go through the same checklist above, making any edits and adjustments that are most appropriate for your business.
When you click the blue “Manage Page” from the Edit Profile box, this will put you into a totally different set of information to examine and edit. You may want to work on this with your web developer to ensure any actions align with previous actions and don’t deter from your social media success.
YouTube
If video marketing is a high priority in your social media strategy, then you will want to be thorough in your approach to getting this part of your social house in order.
Our society is more and more visual every day, so if you have NOT been doing a lot on YouTube, dust your channel off, and prepare to re-ignite. Those that use video marketing, and do it well, will have an easier road to social media success.
YouTube is now feature-rich, and very much a social network. Further, when people want to know how to do something, they search for a how-to video on YouTube. When they arrive at your video, They want to play it, get what they need in a clear, concise manner, and either learn more or move on. (HINT: You want them to stay and learn more)
In other words, your video needs to be well done, look good, include information that adds value for your target market, and leads your viewers to the next step that can help them and solve a problem.
It only makes sense that your channel should be easy to navigate, and each video with clear description.
NOTE: If you are working with a web developer to optimize your Google business listing with SEO, Pay Per Click, or other similar efforts, you may want to work with them to also optimize your YouTube channel under the hood, so efforts are in harmony, and not hindering your social media success.
DIY Tidy
From your main channel page, bring your cursor all the way over to the far right of your cover banner image. Hover the mouse just under that far corner, and you’ll see an “edit pencil” appear. When you click it, you see options for:
Just click the 3 little dots in the upper right of the Collection card and you are on your way!
Communities
You can reach the Google+ Communities you belong to on the left side bar via your G+ profile (or Company Page). Once you click, you’ll be taken to a screen that shows you any Community invitations you may have missed. Accept or decline, as you wish.
Across the top in green, you can see Google+ Communities you are a member of, and this would be a great time to edit memberships – Hop out of any that do not fit your business goals.
Across the top on the far right is a tab for Communities that you own or Admin. Just like the Collections, you will click the mini-card to reach your Google+ Community, and click the three dots at the upper right to tweak images and title text.
Don’t miss the switch at the bottom to either make the Community available in search or to make it private, and only visible to Community members.
Before you leave any Community you own or Admin, take a tour through the content categories and make sure there are no posts to delete that you may have missed before now. Negative or misplaced posts can inhibit social media success.
Google+ Company Pages
Before anything else, it is important that your business is a verified business by Google so you can be found by your target market online. Your activities on Google+ will then also help give you lift in search.
If your business is not yet verified, or you have questions about this, be in touch and we’ll point you in the right direction.
Due to the fact that Google+ allows Company Pages to interact in Communities, the sidebar on the left will look identical to the one you see for your Google+ Profile. You should go through the same checklist above, making any edits and adjustments that are most appropriate for your business.
When you click the blue “Manage Page” from the Edit Profile box, this will put you into a totally different set of information to examine and edit. You may want to work on this with your web developer to ensure any actions align with previous actions and don’t deter from your social media success.
YouTube
If video marketing is a high priority in your social media strategy, then you will want to be thorough in your approach to getting this part of your social house in order.
Our society is more and more visual every day, so if you have NOT been doing a lot on YouTube, dust your channel off, and prepare to re-ignite. Those that use video marketing, and do it well, will have an easier road to social media success.
YouTube is now feature-rich, and very much a social network. Further, when people want to know how to do something, they search for a how-to video on YouTube. When they arrive at your video, They want to play it, get what they need in a clear, concise manner, and either learn more or move on. (HINT: You want them to stay and learn more)
In other words, your video needs to be well done, look good, include information that adds value for your target market, and leads your viewers to the next step that can help them and solve a problem.
It only makes sense that your channel should be easy to navigate, and each video with clear description.
NOTE: If you are working with a web developer to optimize your Google business listing with SEO, Pay Per Click, or other similar efforts, you may want to work with them to also optimize your YouTube channel under the hood, so efforts are in harmony, and not hindering your social media success.
DIY Tidy
From your main channel page, bring your cursor all the way over to the far right of your cover banner image. Hover the mouse just under that far corner, and you’ll see an “edit pencil” appear. When you click it, you see options for:
 American Express OPEN‘s YouTube channel is a great example of social media success, and well-used online real estate. The branding is clear and sharp, their featured video is current and related to current projects, and they have used their navigation options well to showcase their other videos and playlists. You can even see their recommendations of other brand and related niche channels.
Tip: Pull their channel up and reference it as you work on your own.
Before you head out, take the opportunity to view your channel as both a new visitor and returning subscriber (click the little arrow next to your channel name).
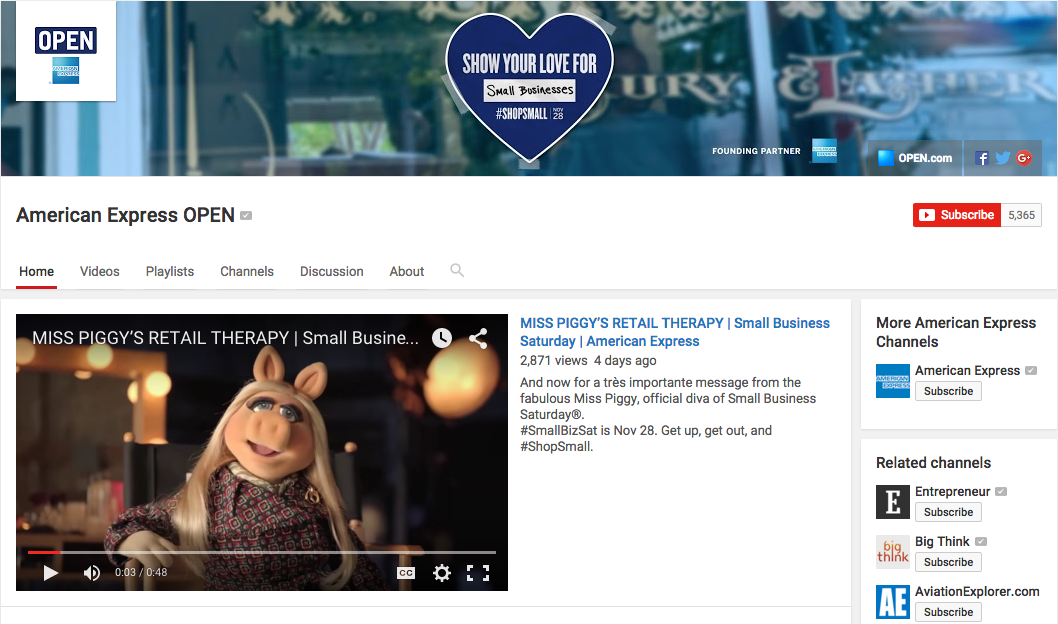
American Express OPEN‘s YouTube channel is a great example of social media success, and well-used online real estate. The branding is clear and sharp, their featured video is current and related to current projects, and they have used their navigation options well to showcase their other videos and playlists. You can even see their recommendations of other brand and related niche channels.
Tip: Pull their channel up and reference it as you work on your own.
Before you head out, take the opportunity to view your channel as both a new visitor and returning subscriber (click the little arrow next to your channel name).
How To Get Your Social House In Order For Social Media Success
The social media landscape changes so fast, brands, small businesses, and solopreneurs all stay breathless to keep up with platform changes and the latest techniques to reach their ideal customers. Over time, we can become so focused on keeping up that we may forget to circle back and make needed updates to our “social house,” or online properties. That can actually detract from our social media success.Blueprints And Floor Plans
Efforts to get your social house in order for social media success are common when:- There is a change of organization leadership
- There is a change of social media strategy
- A combination of both
- Understand how to optimize individual major social networks
- Visualize what your target market sees at your social properties
- Plan your steps for a clear and impactful social media portfolio
Duck On The Porch?
 Everyone wants to experience social networking success…
Those small business social media success stories you hear about? They had their ducks in a row, and their social house was probably in order!
So, are you ready to get started spiffing up your social house?
Everyone wants to experience social networking success…
Those small business social media success stories you hear about? They had their ducks in a row, and their social house was probably in order!
So, are you ready to get started spiffing up your social house?
Social House Foundation – Vital For Social Media Success
When you’re getting your social house in order, an important question to ask: What social networks should I be on going forward, and why? Social media success starts there – Aligning actions to goals and vice versa. Preparing For Spiffy – 3 Steps Some initial steps before getting into the nooks and crannies:- If you have not yet done a basic social media audit of your online presence, do that first.
- Do a brief overview of your competitors – Where are they online? What are they doing?
- Make a list of how you can you use your brand’s strengths to outpace competitors.
Social Media Success: Checklist – Getting Your Social House In Order
Consider this the walls, windows, and doors of your social house. There are a lot of details here! Edit And Polish Each Social Property (Digital Windex) You will be drilling down into the details for each social media profile on each social platform where you have a presence. For each, you should review, as they apply:- Bios
- Company descriptions
- Brand history
- Services offered
- Links
- Applications attached to the profile
- Imagery and videos
 Imagery and videos are like the “gingerbread” on the house, and for many, this is often the most fun.
If you have reserved a social profile in your brand name for the sole purpose of assuring it be there for the future, do check in on it. Make sure the correct links and imagery are reflected for your brand. If it is more appropriate to leave the profile void of details, then at least change the password if it has been awhile since you visited.
Your social media success does not hinge on the number of profiles where you are active as much as it is attached to the quality of presentation.
Now lets get more social network specific…
Facebook
Facebook allows you many opportunities to be brand-forward, so what you enter in on your profile and Business Page directly contributes to your social media success on the platform, and your “FEO” (SEO, Facebook-style).
Use your brand and niche key words, and sprinkle them throughout your text.
For Facebook Personal Profiles:
Your Facebook Profile has categories of details: Timeline, About, Friends, Photos, and More. Since your profile is your passport to the rest of Facebook, go through these with a fine-tooth comb.
Under About, edit and polish your sub-categories:
Imagery and videos are like the “gingerbread” on the house, and for many, this is often the most fun.
If you have reserved a social profile in your brand name for the sole purpose of assuring it be there for the future, do check in on it. Make sure the correct links and imagery are reflected for your brand. If it is more appropriate to leave the profile void of details, then at least change the password if it has been awhile since you visited.
Your social media success does not hinge on the number of profiles where you are active as much as it is attached to the quality of presentation.
Now lets get more social network specific…
Facebook
Facebook allows you many opportunities to be brand-forward, so what you enter in on your profile and Business Page directly contributes to your social media success on the platform, and your “FEO” (SEO, Facebook-style).
Use your brand and niche key words, and sprinkle them throughout your text.
For Facebook Personal Profiles:
Your Facebook Profile has categories of details: Timeline, About, Friends, Photos, and More. Since your profile is your passport to the rest of Facebook, go through these with a fine-tooth comb.
Under About, edit and polish your sub-categories:
- Overview
- Work And Education
- Places You’ve Lived
- Contact And Basic Info
- Family And Relationships
- Details About You
- Life Events
- Page Info – Sprinkling key words in all relevant descriptions and correct, updated links
- Milestones – Are there brand accomplishments that should be added to your Timeline?
- Page Owners – Decide if you want your personal profile visible to the world here
- Apps – Be sure all are reflecting correct imaging and details. Remove or turn off any that do not apply any longer.
- Book Now
- Call Now
- Contact Us
- Send Message
- Use App
- Play Game
- Shop Now
- Sign Up
- Watch Video
You can choose to promote your call to action, so make your call-to-action delicious to encourage your social media success here. Don’t forget to insert a correct web address link where the pop-up box asks for it.
For Facebook Groups:
If you have a Facebook group for your brand or organization, you might as well tidy up here too.
Facebook does not give you as many areas to edit in Facebook Groups. The main areas you want to pay attention to are:
Group Image – Decide on a banner, or to feature your most active members. In the far right of this space is a button with three dots. Clicking this will let you get into your settings to edit your Group’s name, icon, type, tags, privacy, customized web address, and the description to the most current preferences.
Group Description – This is how potential new members will find your group. Make your words as relevant to the group’s purpose as possible. Use the tags feature wisely, as this is how your group will be suggested to others by Facebook.
If you’ve chosen to have a Buy/Sell/Trade Facebook group, you will want to learn about For Sale Group Features, and make the rest of the edits to your group fit with these purposes.
From there, tidy up your Files section to delete any really old files that are no longer relevant, or files members snuck in that really do not fit the group’s purpose.
Facebook has many options that afford for just as many details to track. Tending to them gives you a greater chance of social media success on the Facebook platform.
Twitter
After the intricacies of Facebook above, Twitter will seem like a breeze!
From your profile page, if you click on the “Edit Profile” button on the far right, just below the banner image, Twitter makes it easy to quick edit the:
- Profile image
- Banner image
- User name
- Bio
- Theme color
- Birthday
Always err on the side of caution when disclosing personal details online.
You get 160 characters for your bio, so be strategic with niche key words and one or two hashtags.
Your theme color can be one of the pre-set colors Twitter offers you, or you can use a custom color code to match your brand.
Regarding imagery, people like to connect with other people, so decide whether you will use a face image, or your logo. If you have been struggling to reach goals, this might be a good time to test something new. The banner image is very large, so be careful when choosing. You want to avoid a fuzzy appearance. It may be to your advantage to have a designer help you with something customized at 1500 x 500.
Give some attention to:
- Followers
- Photos/Videos
- Lists
- Conversation
- Competition (make it private)
- Choose a key word or key phrase
- Popular hashtags for your niche
Periodically updating your account information and password is time well spent!
This goes for all social platforms.
On the left bar also head into the following categories to update your preferences:
- Security & Privacy
- Email Notifications
- Web Notifications
- Design – For any tweaks to the appearance of your profile
- Apps
It may be easiest to click the “Edit Profile” button – This can be done on mobile or desktop.
The text in the bio should tie to your strategy goals, lead people to learn more about your business, and also draw them in to explore your Instagram gallery. Edit your bio to be clear, concise, and include brand and niche key words.
Your link can be changed as often as you like. Be sure this is always the link tied to your current promotion or brand project.
Once you are satisfied with the basic profile details, scroll down to click the box to let Instagram recommend your profile when recommending similar accounts, and click, “submit.”
Approach the left bar of settings categories much like you did with your Twitter profile. Update your profile photo if desired, change your password, and revoke access to unnecessary apps.
Next, inventory the gallery. Your efforts should be a lot like curating a magazine. If there are images or videos here that you may have changed your mind about, copy and save them, and delete them for now. Your goal is to put forward your best brand presence. You can re-purpose this content on other channels if you wish.
Always save your work as you go.
In the top upper right, click your ID name, and choose, “view profile.” Check to make sure you are satisfied with your final edits, and log out when you are finished.
Logging out provides safety to your profile, and your mobile phone. Again, security strength always contributes to social media success.
Pinterest
Again, a very visual platform – Take a look at your profile as a regular web visitor before you log in to make any edits. Once logged in, click up in the top right corder to the “Edit Profile” button, and click.
First, your profile image is very small here, so it should match all of your other platforms, or be a simple version of your logo.
Second, make any tweaks to your bio. You get a space slightly longer than Twitter provides. The box will turn red if you exceed the character limit.
Hopefully, you’ve already verified your website. If not, do this! It looks harder than it is – If you hand this off to your web developer, or if you are WordPress savvy, it will take ten minutes or less. Get the instructions to verify your website on Pinterest here.
Save your edits by clicking the red button on this pop up box.
From there, you will want to click the button next to the Edit Profile button – It has a spoke wheel and arrow. The first option is “Edit Settings.” Clicking that will bring you to a screen with multiple categories showing.
Up first, you can change your password and tweak your category if desired. You have already completed the profile options. So, from here, be sure all of the buttons reflect your preferences for notifications, and your preferred social networks are connected and enabled.
At the bottom of your screen, click the red button to save settings when you are finished.
Now that your general settings are refreshed, take an inventory of your boards:
- Weed out any group boards that no longer reflect your brand’s mission
- Delete boards that no longer fit with your purpose for being on Pinterest
- Combine boards that have evolved closely
- Renew board covers (brand them all if you like!)
Over time, you can accumulate an abundance of pins. The newer “move” feature is terrific for re-organizing Pinterest boards! Simply click any of your board titles, and when you see all the pins for that board, in the upper right, click “move.” And then select the pins you wish to move, and to the preferred board.
During the process of organizing your Pinterest boards, it is important to tweak and edit board names as well board descriptions.
- Update descriptions with most relevant key words depict of the pins on each board
- Remove hashtags from board descriptions – You’ll get more visibility in search
- Use the most relevant niche terms in your board titles
- Profile Image
- Banner Image
- Title
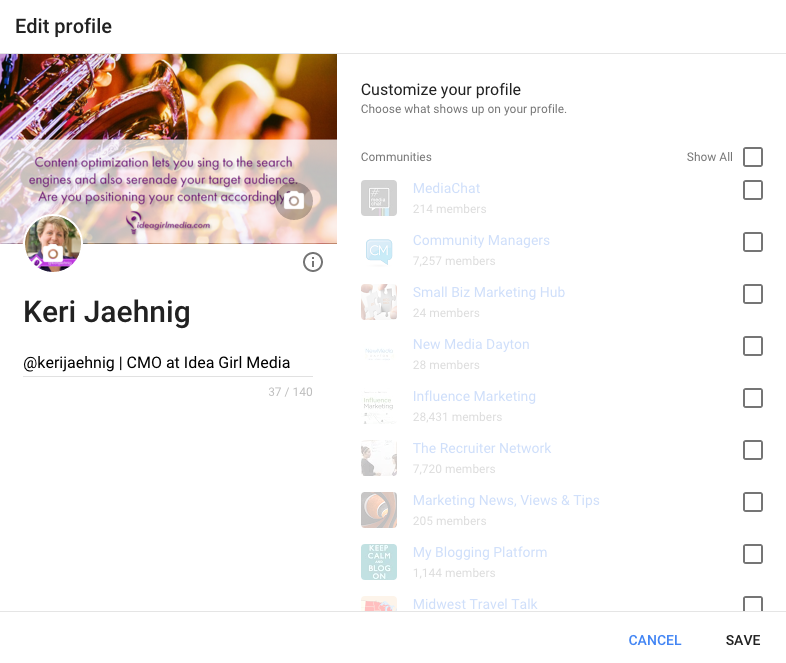
- Communities that will be visible on your Google+ profile
Very simple – Click the boxes that suit your preference, and click to save.
Once you’re done checking out your refreshed profile look, head to the left side bar, and click “Settings.” You’ll be led to a screen with a series of buttons to switch on and off. This is pretty self-explanatory. Also, this saves automatically with the click or check.
Make the decisions that are best for you. One suggestion: Under Advanced Settings, allow the circle stream in navigation. If you have been around long enough to have curated connection circles, it’s nice to be able to see what your contacts are up to, right?
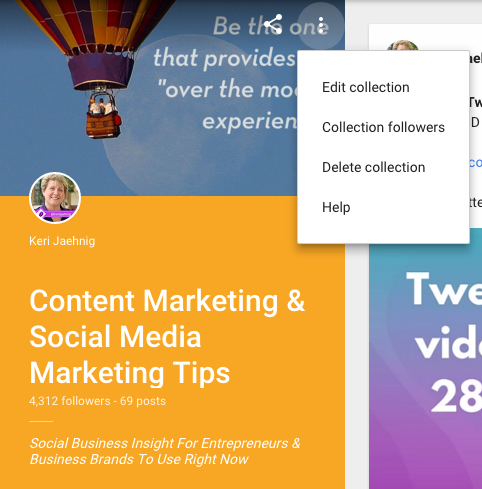
Above Settings on the left, you can click on “Collections.” Here, you will see the collections you own and are following. On any that you own, you will want to tweak:
- Image banner
- Color banner
- Title text
Just click the 3 little dots in the upper right of the Collection card and you are on your way!
Communities
You can reach the Google+ Communities you belong to on the left side bar via your G+ profile (or Company Page). Once you click, you’ll be taken to a screen that shows you any Community invitations you may have missed. Accept or decline, as you wish.
Across the top in green, you can see Google+ Communities you are a member of, and this would be a great time to edit memberships – Hop out of any that do not fit your business goals.
Across the top on the far right is a tab for Communities that you own or Admin. Just like the Collections, you will click the mini-card to reach your Google+ Community, and click the three dots at the upper right to tweak images and title text.
Don’t miss the switch at the bottom to either make the Community available in search or to make it private, and only visible to Community members.
Before you leave any Community you own or Admin, take a tour through the content categories and make sure there are no posts to delete that you may have missed before now. Negative or misplaced posts can inhibit social media success.
Google+ Company Pages
Before anything else, it is important that your business is a verified business by Google so you can be found by your target market online. Your activities on Google+ will then also help give you lift in search.
If your business is not yet verified, or you have questions about this, be in touch and we’ll point you in the right direction.
Due to the fact that Google+ allows Company Pages to interact in Communities, the sidebar on the left will look identical to the one you see for your Google+ Profile. You should go through the same checklist above, making any edits and adjustments that are most appropriate for your business.
When you click the blue “Manage Page” from the Edit Profile box, this will put you into a totally different set of information to examine and edit. You may want to work on this with your web developer to ensure any actions align with previous actions and don’t deter from your social media success.
YouTube
If video marketing is a high priority in your social media strategy, then you will want to be thorough in your approach to getting this part of your social house in order.
Our society is more and more visual every day, so if you have NOT been doing a lot on YouTube, dust your channel off, and prepare to re-ignite. Those that use video marketing, and do it well, will have an easier road to social media success.
YouTube is now feature-rich, and very much a social network. Further, when people want to know how to do something, they search for a how-to video on YouTube. When they arrive at your video, They want to play it, get what they need in a clear, concise manner, and either learn more or move on. (HINT: You want them to stay and learn more)
For social media success on YouTube, you’ve got to be attractive, correct, wooing, and sticky!
In other words, your video needs to be well done, look good, include information that adds value for your target market, and leads your viewers to the next step that can help them and solve a problem.
It only makes sense that your channel should be easy to navigate, and each video with clear description.
NOTE: If you are working with a web developer to optimize your Google business listing with SEO, Pay Per Click, or other similar efforts, you may want to work with them to also optimize your YouTube channel under the hood, so efforts are in harmony, and not hindering your social media success.
DIY Tidy
From your main channel page, bring your cursor all the way over to the far right of your cover banner image. Hover the mouse just under that far corner, and you’ll see an “edit pencil” appear. When you click it, you see options for:
- Edit channel navigation
- Channel settings
- Translate channel info
- Videos
- Playlists
- Channels
- Discussion
- About
- Status and features
- Upload defaults
- Featured content
- Branding
- Advanced
Image notes: American Express OPEN’s YouTube Channel
Same House, Different Room
Have you noticed that the process is similar from social network to social network? Above you see details for popular social networks at this time. Others that may be appropriate to edit and polish are:- Slideshare
- Tumblr
- Vimeo
- SnapChat
- Periscope
- Meerkat
- Blab
Social House – Ready To Rock For Social Media Success
Congratulations – You’re on your way to a solid foundation, painted the house, and decorated the gingerbread! As you progress from one social platform to the next, the process will become easier and you will be able to copy and paste some of the details. It may seem tedious, but the social media success you will experience makes this well worth the time investment. Suggestion: Start well before a year’s end and divide your time into bite-size chunks. In turn, this social media success checklist for getting your social house in order becomes a map for your 30 days to social media success. Now, the only questions for you are… Can you now picture how a clean and clear slate can contribute to your social media success? What curiosities do you have about the content above and getting your social house in order? More experienced readers — What social media success stories can you offer from planning in this way? Please share your thoughts and questions with me in the comments box below. And please keep me posted on your progress, so I might feature you here in the future as a social media success! 🙂 ➤ If you found this article helpful, and would like to hear about our upcoming projects that can help you achieve social media success, sign up to be among the first to know.One reply
-
HI Keri I just loved reading your articles. 😀 The best thing which I really like about your articles is, you covers each and every thing in your articles which makes your article more helpful. I have seen people love to read those articles more which are easy to understand and can help a lot. And you always write such kind of articles. Either way, Thanks for this wonderful article. 😀
Leave a Reply

Subscribe To The Newsletter
Like what you see? We've been told our blog posts are like potato chips: You can't read just one...
Subscribe to receive them fresh in your Inbox, and you can grab our best insights about social media marketing before everyone else sees it!

Relevant Resources
view allThe True Cost Of Letting Peak Sales Periods Pass You By

Are you looking to grow your business and develop your team? Education always pays off — Here are seven ways…...
Three Surprising Signs You’re Still Silencing Your Female Employees

Learn how to identify and address subtle behaviors on your teams that may still be silencing female employees in your…...
How Ongoing Training In The Workplace Can Drive Long-Term Business Growth

Ongoing training and development is more than just an investment in your employees – the cornerstone of your company’s success.…...


































By Lisa Chaves on